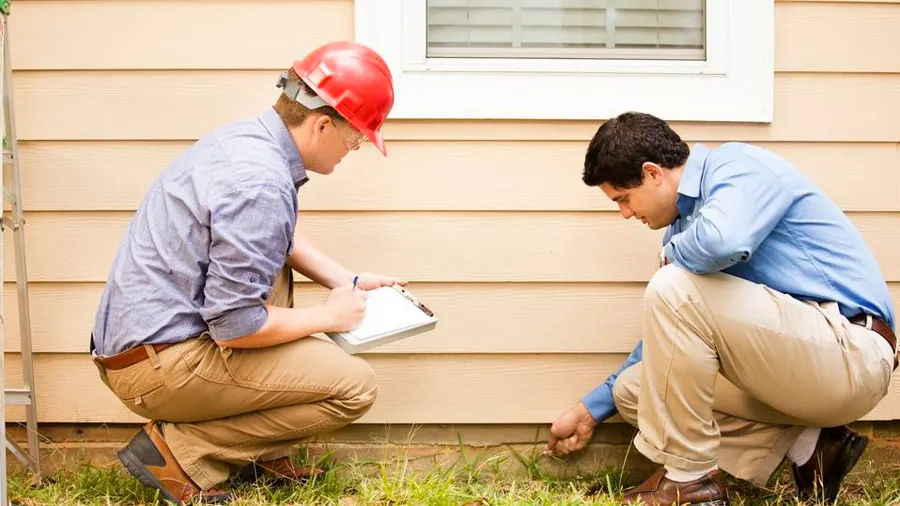
How to prepare for home inspection with this simple checklist
Prepare for a Home Inspection with This Checklist
Whether you’re selling your home or just want to ensure it’s in top condition, a home inspection is a crucial step. Preparing for a home inspection can seem daunting, but with the right guidance, you can make the process smooth and stress-free. In this comprehensive guide, we’ll provide you with a detailed checklist to help you prepare for a home inspection, ensuring that your property is ready for scrutiny and any potential issues are addressed beforehand.
Table of Contents
- Why a Home Inspection Is Important
- Pre-Inspection Checklist Overview
- Interior Preparation
- Exterior Preparation
- Mechanical Systems Check
- Documentation and Access
- Safety Precautions
- Common Issues to Address
- Working with the Inspector
- After the Inspection
- Conclusion
- About Wrestore
1. Why a Home Inspection Is Important
A home inspection provides a thorough evaluation of a property’s condition, identifying potential issues that may affect its value or safety. For sellers, addressing problems before listing can improve marketability. For buyers, it ensures transparency and informs negotiation. Preparing adequately helps avoid surprises and facilitates a smoother transaction.
Benefits of a Home Inspection:
- Identifies Hidden Issues: Uncovers problems not immediately visible.
- Facilitates Negotiations: Provides leverage in price discussions.
- Ensures Safety: Detects hazards like faulty wiring or structural defects.
- Peace of Mind: Confidence in the property’s condition.
SEO Keywords: prepare for home inspection, importance of home inspections, home inspection benefits
2. Pre-Inspection Checklist Overview
Preparing for a home inspection involves both addressing potential issues and ensuring the inspector has easy access to all areas. This checklist is divided into key areas to help you systematically prepare for a home inspection.
Checklist Sections:
- Interior Preparation
- Exterior Preparation
- Mechanical Systems Check
- Documentation and Access
- Safety Precautions
Tip: Start preparing well in advance to address any issues without rushing.
3. Interior Preparation
The interior of your home will be thoroughly examined. Ensure everything is in good working order and accessible.
Steps:
- Check Doors and Windows: Ensure they open and close smoothly, and locks function properly.
- Inspect Walls and Ceilings: Repair any cracks, holes, or water stains.
- Test Light Fixtures: Replace burnt-out bulbs and fix any faulty fixtures.
- Examine Floors: Repair damaged tiles or floorboards; clean carpets.
- Ensure Smoke and CO Detectors Are Functional: Replace batteries if needed.
- Service Appliances: Ensure built-in appliances are working correctly.
SEO Keywords: prepare for home inspection, interior home inspection checklist, home inspection preparation
4. Exterior Preparation
The outside of your home is just as important. Address any issues that could raise concerns.
Steps:
- Inspect the Roof: Look for missing or damaged shingles; clean gutters.
- Check Siding and Paint: Repair cracks or peeling paint.
- Examine the Foundation: Look for cracks or signs of settling.
- Assess Drainage: Ensure downspouts direct water away from the house.
- Maintain Landscaping: Trim overgrown plants; remove debris.
- Test Outdoor Lights and Outlets: Ensure they are functional and safe.
Tip: Regular exterior maintenance can prevent long-term damage and costly repairs.
5. Mechanical Systems Check
The inspector will evaluate your home’s mechanical systems. Ensure they are in good working order.
Steps:
- Heating and Cooling Systems: Replace filters; consider servicing if overdue.
- Plumbing: Check for leaks under sinks; ensure toilets flush properly.
- Electrical Panel: Label breakers; ensure no exposed wiring.
- Water Heater: Verify it’s functioning correctly; no leaks or rust.
- Test All Faucets: Ensure proper water pressure and temperature control.
SEO Keywords: prepare for home inspection, mechanical systems inspection, home inspection checklist
6. Documentation and Access
Providing documentation and ensuring easy access to all areas helps the inspection go smoothly.
Steps:
- Gather Documentation: Compile manuals, warranties, and records of repairs or upgrades.
- Provide Access to Attic and Crawl Spaces: Clear paths and unlock any doors.
- Ensure Utilities Are On: Water, electricity, and gas should be operational.
- Unlock Gates and Sheds: The inspector may need to assess these areas.
- Remove Pets: Keep pets secured or off-site during the inspection.
Tip: Being organized and cooperative leaves a positive impression on both the inspector and potential buyers.

7. Safety Precautions
Ensure your home is safe for the inspector to move around freely.
Steps:
- Secure Loose Handrails: Fix any wobbly railings.
- Remove Trip Hazards: Clear clutter from hallways and stairs.
- Label Hazardous Areas: Mark low ceilings or steps.
- Test Garage Door Sensors: Ensure automatic reverse functions properly.
- Check for Gas Leaks: If you suspect a leak, have it professionally addressed immediately.
SEO Keywords: prepare for home inspection, safety precautions, home inspection safety
8. Common Issues to Address
Addressing common problems beforehand can prevent them from becoming negotiation points.
Issues:
- Moisture and Mould: Fix leaks and remediate any mould growth.
- Pest Infestations: Eliminate pests and repair related damage.
- Structural Concerns: Repair cracks in walls or foundation.
- Outdated Electrical Systems: Replace old wiring or fuse boxes as needed.
- Environmental Hazards: Address asbestos, lead paint, or radon if present.
Tip: Consult professionals for major repairs to ensure they are done correctly and documented.
9. Working with the Inspector
Establishing a good rapport with the inspector can facilitate a smoother process.
Tips:
- Be Present but Unobtrusive: Be available to answer questions but give the inspector space to work.
- Answer Questions Honestly: Provide accurate information about the property.
- Provide Requested Documents: Have records readily available.
- Avoid Arguing: If discrepancies arise, note them and address them calmly.
SEO Keywords: prepare for home inspection, working with home inspector, home inspection tips
10. After the Inspection
Once the inspection is complete, there are steps to take regardless of the outcome.
Steps:
- Review the Report: Understand the findings thoroughly.
- Address Issues: Decide which repairs are necessary or negotiate accordingly.
- Keep Documentation: Retain records of any additional repairs or maintenance.
- Maintain Open Communication: Stay in touch with your real estate agent and the buyer (if applicable).
Tip: Proactive communication can prevent misunderstandings and facilitate a successful sale.
11. Conclusion
Preparing for a home inspection doesn’t have to be overwhelming. By following this comprehensive checklist, you can confidently prepare for a home inspection, ensuring your home is ready for evaluation. Addressing issues proactively not only helps the inspection go smoothly but can also increase your property’s appeal to potential buyers. Remember, a well-maintained home reflects positively on you and can expedite the selling process.
12. About Wrestore
Commercial and Residential Property Maintenance Specialists
At Wrestore, we are dedicated to helping homeowners maintain and enhance their properties. Based in London and serving areas within the M25, we bring over 30 years of combined experience in the property and built environment sector.
Our Services Include:
- Pre-Sale Maintenance: Helping you prepare your home for inspection and sale.
- General Maintenance: Routine upkeep to keep your property in optimal condition.
- Repairs and Refurbishment: Addressing issues identified during inspections.
- Cleaning Services: Professional cleaning to enhance your home’s appeal.
- Handyman Services: Versatile assistance for various tasks around your property.
For more information on our services, visit our services page.
Why Choose Wrestore?
- Reliability: We deliver hassle-free, dependable service that you can trust.
- Why Siding Maintenance Is Important
- Types of Home Siding
- Safety Precautions Before You Begin
- Tools and Materials Needed
- How to Maintain Home Siding
- Cleaning Tips for Different Siding Materials
- Repairing Common Siding Issues
- Preventative Maintenance Strategies
- When to Call a Professional
- Common Mistakes to Avoid
- Conclusion
- About Wrestore
- Enhances Curb Appeal: Keeps your home looking attractive.
- Prevents Damage: Protects against rot, mould, and insect infestations.
- Increases Longevity: Extends the lifespan of your siding material.
- Improves Energy Efficiency: Maintains insulation properties.
- Saves Money: Avoids expensive repairs or replacements.
- Vinyl Siding: Durable, low-maintenance plastic material.
- Wood Siding: Offers a natural look but requires regular upkeep.
- Fiber Cement Siding: Composite material mimicking wood or masonry.
- Brick and Stone Veneer: Natural or manufactured stone applied to the exterior.
- Metal Siding: Usually aluminium or steel, durable and weather-resistant.
- Use Proper Equipment: Secure ladders on stable ground and use safety harnesses if necessary.
- Wear Protective Gear: Gloves, safety glasses, and masks protect against debris and chemicals.
- Be Cautious with Chemicals: Follow instructions when using cleaning agents or pesticides.
- Avoid Electrical Hazards: Be mindful of power lines when using ladders or pressure washers.
- Work in Suitable Weather: Avoid maintenance during extreme weather conditions.
- Pressure Washer or Garden Hose with Spray Nozzle
- Soft-Bristle Brush
- Extension Ladder
- Putty Knife or Scraper
- Caulking Gun
- Paintbrushes and Rollers (for painting or staining)
- Sandpaper
- Safety Equipment (gloves, goggles, mask)
- Cleaning Solutions (mild detergent, vinegar, or commercial cleaners)
- Exterior Caulk
- Paint or Stain (as needed)
- Replacement Siding Panels (for repairs)
- Wood Filler or Epoxy (for wood siding repairs)
- Rinse with Water: Use a garden hose to remove loose dirt and debris.
- Apply Cleaning Solution: Use a mild detergent or appropriate cleaner for your siding type.
- Scrub Gently: Use a soft-bristle brush to remove stubborn stains.
- Rinse Thoroughly: Ensure all soap residue is washed away.
- Check for Cracks or Holes: Look for physical damage to siding panels.
- Examine Seams and Joints: Ensure caulking is intact to prevent moisture intrusion.
- Look for Signs of Rot or Insects: Particularly important for wood siding.
- Assess Paint or Finish: Check for peeling paint or faded stain that may need reapplication.
- Repair Damage: Replace or fix damaged siding panels.
- Re-Caulk Seams: Use exterior-grade caulk to seal gaps.
- Repaint or Restain: Protect siding with a fresh coat as needed.
- Use Mild Detergents: A mixture of water and dish soap works well.
- Avoid Harsh Chemicals: Bleach or solvents can damage vinyl.
- Pressure Washing: Use low pressure to prevent cracking.
- Gentle Cleaning: Use a soft brush and mild cleaner.
- Avoid Excessive Water: Prevent water saturation to reduce the risk of rot.
- Remove Mould and Mildew: Use a solution of vinegar and water or a wood-safe cleaner.
- Use Non-Abrasive Cleaners: Avoid harsh chemicals that can damage the surface.
- Rinse Well: Ensure all cleaner is removed to prevent residue.
- Check Manufacturer Guidelines: Follow specific instructions for your product.
- Use a Soft Brush: Remove dirt without damaging the surface.
- Avoid Acidic Cleaners: Can erode mortar and stone surfaces.
- Seal Periodically: Apply a masonry sealant to protect against moisture.
- Clean the Area: Remove dirt and debris from the damaged area.
- Apply Filler: Use appropriate filler (e.g., wood filler for wood siding).
- Sand Smooth: Once dry, sand the area to match the surrounding surface.
- Paint or Stain: Match the existing colour to conceal the repair.
- Secure Loose Panels: Use nails or clips designed for your siding material.
- Replace Missing Panels: Obtain matching siding and install according to manufacturer instructions.
- Remove Old Caulk: Use a scraper to eliminate deteriorated caulk.
- Clean the Joint: Ensure the area is dry and free of debris.
- Apply New Caulk: Use exterior-grade caulk to seal gaps.
- Inspect Biannually: Check siding at least twice a year and after severe weather.
- Monitor High-Risk Areas: Pay attention to areas near gutters, downspouts, and windows.
- Maintain Gutters and Downspouts: Ensure proper drainage away from siding.
- Trim Vegetation: Keep plants away from siding to prevent moisture retention.
- Address Leaks Promptly: Fix any leaks that could affect siding.
- Seal Gaps: Prevent insects from entering through cracks or joints.
- Use Pest Barriers: Apply treatments as necessary to deter pests.
- Remove Nesting Materials: Keep the area around your home clear of debris.
- Structural Damage: Significant damage affecting the building’s integrity.
- Mould or Rot: Extensive areas of mould or rot may need specialized treatment.
- Asbestos Concerns: Older homes may have asbestos siding requiring professional handling.
- High or Inaccessible Areas: Safety risks when working at heights.
- Lack of Experience: If unsure about the repair process or materials.
- Using High-Pressure Washing: Can damage siding materials, especially vinyl and wood.
- Neglecting Maintenance: Ignoring small issues can lead to significant damage.
- Incorrect Cleaning Products: Harsh chemicals may damage siding or harm the environment.
- Painting Over Issues: Covering up problems without addressing the underlying cause.
- Poor Installation of Repairs: Improperly installed siding can lead to moisture intrusion.
- Siding Maintenance and Repair: Professional services to help you maintain home siding and address any issues.
- General Maintenance: Routine upkeep to keep your property in optimal condition.
- Refurbishment: Comprehensive property upgrades tailored to your needs.
- Painting and Decorating: Expert services to refresh your home’s exterior and interior.
- Handyman Services: Versatile assistance for various tasks around your property.
- Reliability: We deliver hassle-free, dependable service that you can trust.
- Expertise: Our skilled team ensures high-quality workmanship on every project.
- Accreditations: We are accredited by Alcumus SafeContractor and Alcumus SafePQQ, demonstrating our commitment to safety and professionalism.
- Customer Satisfaction: See our reviews on Trustpilot and discover why clients choose us for their property maintenance needs.
- Why DIY Projects Go Wrong
- Common Mistake 1: Lack of Planning
- Common Mistake 2: Using the Wrong Tools
- Common Mistake 3: Ignoring Safety Precautions
- Common Mistake 4: Skipping Preparation Steps
- Common Mistake 5: Underestimating Time and Cost
- Common Mistake 6: Taking on Projects Beyond Skill Level
- Common Mistake 7: Neglecting Building Codes and Permits
- Tips to Avoid DIY Mistakes
- When to Call a Professional
- Conclusion
- About Wrestore
- Insufficient Knowledge: Tackling projects without the necessary skills or understanding.
- Poor Planning: Failing to prepare adequately before starting.
- Cutting Corners: Skipping essential steps to save time or money.
- Improper Tool Use: Using incorrect or inadequate tools for the job.
- Underestimating Complexity: Not recognizing the true scope of the project.
- Create a Detailed Plan: Outline each step of the project before starting.
- Research Thoroughly: Understand the materials, tools, and techniques required.
- Set Realistic Goals: Establish achievable timelines and objectives.
- Invest in Quality Tools: High-quality tools perform better and last longer.
- Learn Proper Tool Use: Understand how to operate each tool safely and effectively.
- Rent Specialized Equipment: For one-time projects, consider renting tools instead of buying.
- Wear Protective Gear: Use safety glasses, gloves, masks, and appropriate clothing.
- Follow Safety Guidelines: Adhere to manufacturer instructions and industry standards.
- Keep Work Area Clean: A tidy workspace reduces the risk of accidents.
- Be Mindful of Electrical Hazards: Turn off power when working with electrical components.
- Prepare Surfaces Properly: Clean, sand, or prime surfaces as required.
- Measure Accurately: Use precise measurements to ensure components fit correctly.
- Organize Materials: Gather all necessary materials before starting.
- Create a Budget: Account for all expenses, including materials and tools.
- Allocate Extra Time: Allow for unexpected delays or complications.
- Track Expenses: Keep receipts and monitor spending throughout the project.
- Assess Your Skills: Be honest about your abilities and experience.
- Start Small: Begin with simpler projects to build confidence and skills.
- Seek Guidance: Consult tutorials, books, or experienced individuals.
- Research Regulations: Understand the codes and permits relevant to your project.
- Obtain Necessary Permits: Apply for permits before starting work.
- Comply with Standards: Ensure your work meets all safety and quality standards.
- Plan Thoroughly: Spend ample time in the planning phase.
- Stay Organized: Keep your workspace and materials organized.
- Double-Check Work: Review each step before moving on to the next.
- Take Breaks: Rest to maintain focus and prevent fatigue-related errors.
- Learn Continuously: Keep expanding your knowledge and skills.
- Safety Is a Concern: Projects involving gas lines, electrical work, or structural changes.
- Specialized Skills Are Required: Tasks that require certifications or expert knowledge.
- Time Constraints: If you cannot dedicate sufficient time to the project.
- Quality Is Critical: When professional-level results are necessary.
- Cost Overruns: DIY attempts may end up costing more than hiring a professional.
- Professional Repairs and Maintenance: Expert services to ensure your projects are completed safely and effectively.
- General Maintenance: Routine upkeep to keep your property in optimal condition.
- Refurbishment: Comprehensive property upgrades tailored to your needs.
- Plumbing and Electrical Services: Certified professionals for complex installations and repairs.
- Handyman Services: Versatile assistance for various tasks around your property.
- Reliability: We deliver hassle-free, dependable service that you can trust.
- Expertise: Our skilled team ensures high-quality workmanship on every project.
- Accreditations: We are accredited by Alcumus SafeContractor and Alcumus SafePQQ, demonstrating our commitment to safety and professionalism.
- Customer Satisfaction: See our reviews on Trustpilot and discover why clients choose us for their property maintenance needs.
- Why Rat Pest Control Is Important
- Signs of a Rat Infestation
- Health Risks Associated with Rats
- Safety Precautions Before You Begin
- Methods to Handle Rat Pest Control
- Preventing Future Infestations
- When to Call a Professional
- Common Mistakes to Avoid
- Conclusion
- About Wrestore
- Health Hazards: Spread of diseases like leptospirosis, hantavirus, and salmonellosis.
- Property Damage: Chewed electrical wires, insulation, and structural components.
- Contamination: Food and water sources can become contaminated with rat droppings.
- Rapid Reproduction: Rats breed quickly, leading to larger infestations if not controlled.
- Droppings: Small, dark pellets found along walls or in cupboards.
- Gnaw Marks: Chewed wires, wood, or plastic materials.
- Noise: Scratching or scurrying sounds in walls or ceilings, especially at night.
- Nesting Materials: Shredded paper, fabric, or insulation gathered in hidden areas.
- Footprints: Tracks in dusty areas or grease marks along walls.
- Unusual Pet Behavior: Pets acting agitated or focused on specific areas.
- Leptospirosis: Bacterial infection causing flu-like symptoms.
- Hantavirus: Severe respiratory disease transmitted through inhalation of contaminated dust.
- Salmonellosis: Food poisoning from contaminated food or water.
- Rat-Bite Fever: Infection from bites or scratches causing fever and rash.
- Wear Protective Gear: Use gloves, masks, and eye protection when handling traps or cleaning droppings.
- Avoid Direct Contact: Do not touch rats or nesting materials with bare hands.
- Ensure Proper Ventilation: When using chemicals or cleaning, ventilate the area well.
- Follow Instructions: Use pesticides and traps according to the manufacturer’s guidelines.
- Keep Pets and Children Away: Prevent access to traps and baits.
- Select Appropriate Traps: Choose from snap traps, electronic traps, or live catch traps.
- Place Traps Strategically: Set traps along walls, behind objects, and in areas with signs of activity.
- Bait the Traps: Use attractive baits like peanut butter, nuts, or dried fruit.
- Check Traps Regularly: Dispose of caught rats promptly and reset traps as needed.
- Choose the Right Product: Use approved rodenticides suitable for domestic use.
- Follow Safety Guidelines: Place baits in tamper-resistant bait stations.
- Monitor Bait Stations: Replace bait as consumed and dispose of dead rodents safely.
- Seal Entry Points: Use steel wool, metal flashing, or cement to close gaps and holes.
- Install Door Sweeps: Prevent entry under doors with fitted sweeps.
- Repair Screens: Fix damaged window and vent screens.
- Eliminate Food Sources: Store food in sealed containers and clean up spills promptly.
- Reduce Clutter: Remove debris and unnecessary items where rats can nest.
- Maintain Landscaping: Trim vegetation and keep the area around your home clear.
- Regular Inspections: Check your home periodically for signs of rats.
- Proper Waste Management: Use sealed bins and dispose of garbage regularly.
- Secure Compost Areas: Keep compost in rat-proof containers.
- Maintain Buildings: Repair structural issues that could allow entry.
- Pet Food Storage: Store pet food indoors and remove uneaten food promptly.
- Infestation Persists: Rats remain despite your control efforts.
- Large Infestation: Multiple rats observed or widespread signs of activity.
- Access Issues: Rats are in hard-to-reach places like walls or ceilings.
- Health Concerns: Presence of diseases or severe contamination.
- Lack of Time or Resources: Unable to commit to thorough control measures.
- Ignoring Early Signs: Delaying action allows the infestation to grow.
- Improper Use of Rodenticides: Using poisons without precautions can harm pets and wildlife.
- Inadequate Trapping: Not setting enough traps or placing them incorrectly.
- Failing to Eliminate Food Sources: Rats will return if food is readily available.
- Not Sealing Entry Points: Leaving gaps open invites re-infestation.
- Pest Control Services: Professional solutions to handle rat pest control and other infestations.
- General Maintenance: Routine upkeep to keep your property in optimal condition.
- Refurbishment: Comprehensive property upgrades tailored to your needs.
- Cleaning Services: Deep cleaning and sanitation to prevent pest attraction.
- Handyman Services: Versatile assistance for various tasks around your property.
- Reliability: We deliver hassle-free, dependable service that you can trust.
- Expertise: Our skilled team ensures high-quality workmanship on every project.
- Accreditations: We are accredited by Alcumus SafeContractor and Alcumus SafePQQ, demonstrating our commitment to safety and professionalism.
- Customer Satisfaction: See our reviews on Trustpilot and discover why clients choose us for their property maintenance needs.
- Why Repairing Roof Shingles Is Important
- Common Causes of Shingle Damage
- Safety Precautions Before You Start
- Tools and Materials Needed
- How to Inspect Your Roof for Damage
- Steps to Repair Roof Shingles
- When to Call a Professional
- Preventative Maintenance Tips
- Common Mistakes to Avoid
- Conclusion
- About Wrestore
- Prevents Leaks: Stops water from infiltrating your home.
- Extends Roof Lifespan: Keeps your roof in good condition for longer.
- Improves Energy Efficiency: Reduces heat loss and lowers energy bills.
- Enhances Appearance: Maintains the aesthetic appeal of your property.
- Saves Money: Avoids costly repairs or full roof replacement.
- Weather Conditions: High winds, hail, snow, and heavy rain can damage shingles.
- Sun Exposure: UV rays can cause shingles to deteriorate over time.
- Poor Installation: Incorrectly installed shingles are more prone to damage.
- Age: Shingles naturally wear out as they age.
- Moss and Algae Growth: Can lift shingles and trap moisture.
- Use Proper Equipment: Wear non-slip shoes, a safety harness, and use a sturdy ladder.
- Check the Weather: Only work on the roof in dry, calm conditions.
- Avoid Steep Roofs: If your roof is very steep or high, consider hiring a professional.
- Have a Spotter: Someone should be on the ground to assist and monitor safety.
- Be Aware of Surroundings: Watch for overhead power lines and fragile roof areas.
- Hammer
- Flat Pry Bar
- Utility Knife
- Roofing Nails
- Caulking Gun
- Roofing Cement
- Measuring Tape
- Ladder
- Safety Harness
- Replacement Shingles
- Roofing Felt (if necessary)
- Roofing Sealant
- Visual Inspection from the Ground: Look for missing, cracked, or curled shingles.
- Use Binoculars: For a closer look without climbing up.
- Inspect the Attic: Look for signs of leaks or water stains.
- Climb onto the Roof: If safe, carefully walk on the roof to inspect up close.
- Check Flashings and Vents: Ensure these are intact and sealed properly.
- Loosen the Adhesive: Use a flat pry bar to gently lift the shingle above the damaged one to break the sealant bond.
- Remove Nails: Pry up the nails holding the damaged shingle in place.
- Slide Out the Shingle: Carefully remove the damaged shingle.
- Size the Shingle: Ensure the replacement shingle matches the size of the old one.
- Trim if Necessary: Use a utility knife to adjust the size.
- Slide the Shingle into Place: Position it where the old shingle was removed.
- Nail the Shingle: Use roofing nails to secure it, nailing just above the tab slots.
- Seal the Shingle: Apply roofing cement under the edges to secure it and prevent wind uplift.
- Press Down Firmly: Ensure the shingle adheres properly.
- Apply Roofing Cement: Seal any lifted shingles or exposed nail heads with roofing cement.
- Check Surrounding Shingles: Secure any loose shingles in the area.
- Extensive Damage: Large areas of missing or damaged shingles.
- Structural Issues: Sagging roof or signs of underlying damage.
- Safety Concerns: Steep roofs or difficult access areas.
- Lack of Experience: If you’re unsure about the repair process.
- Insurance Claims: For damage covered by insurance, professional documentation may be required.
- Inspect Regularly: Check your roof at least twice a year and after severe weather.
- Clean Gutters: Keep gutters free of debris to prevent water backup.
- Trim Overhanging Branches: Prevent branches from rubbing against the roof or falling during storms.
- Remove Moss and Algae: Use appropriate cleaners to prevent growth that can damage shingles.
- Ensure Proper Ventilation: Adequate attic ventilation prevents moisture buildup.
- Not Taking Safety Precautions: Ignoring safety can lead to serious injuries.
- Improper Nail Placement: Incorrectly nailing shingles can cause them to come loose.
- Working in Poor Weather: Wet or windy conditions increase risk and can affect repair quality.
- Using Mismatched Shingles: Different shingles can affect the roof’s appearance and performance.
- Overlooking Underlying Damage: Failing to check for deeper issues can lead to recurring problems.
- Roof Repair and Maintenance: Professional services to repair roof shingles and address other roofing issues.
- General Maintenance: Routine upkeep to keep your property in optimal condition.
- Refurbishment: Comprehensive property upgrades tailored to your needs.
- Gutter Cleaning and Repair: Ensure proper drainage and prevent water damage.
- Handyman Services: Versatile assistance for various tasks around your property.
- Reliability: We deliver hassle-free, dependable service that you can trust.
- Expertise: Our skilled team ensures high-quality workmanship on every project.
- Accreditations: We are accredited by Alcumus SafeContractor and Alcumus SafePQQ, demonstrating our commitment to safety and professionalism.
- Customer Satisfaction: See our reviews on Trustpilot and discover why clients choose us for their property maintenance needs.
- Why Choosing Energy-Efficient Windows Is Important
- Understanding Window Energy Ratings
- Types of Energy-Efficient Windows
- Window Frame Materials and Their Impact
- Glazing Options for Energy Efficiency
- Considering Climate and Orientation
- Energy-Saving Features to Look For
- Cost Considerations and Budgeting
- Working with Professional Installers
- Maintenance Tips for Energy-Efficient Windows
- Common Mistakes to Avoid
- Conclusion
- About Wrestore
- Reduced Energy Costs: Lower heating and cooling expenses.
- Enhanced Comfort: Improved temperature regulation indoors.
- UV Protection: Minimizes fading of furnishings due to sunlight.
- Environmental Impact: Decreases your carbon footprint.
- Increased Property Value: Attractive feature for potential buyers.
- U-Value: Measures heat loss; lower values indicate better insulation.
- Solar Gain (g-value): Indicates how much solar heat the window transmits; higher values mean more heat gain.
- Air Leakage (L-factor): Assesses the window’s airtightness.
- Energy Index: Combines U-value, g-value, and L-factor to provide an overall rating.
- Double Glazed Windows: Two panes of glass with a gap between them, providing insulation.
- Triple Glazed Windows: Three panes of glass for enhanced insulation and energy efficiency.
- Low-Emissivity (Low-E) Glass: Coated glass that reflects heat back into the room.
- Secondary Glazing: An additional pane added to existing windows, improving insulation.
- uPVC (Unplasticised Polyvinyl Chloride): Excellent insulation, low maintenance, cost-effective.
- Wood: Good insulator, offers a traditional look, requires regular maintenance.
- Aluminium: Durable, slim profiles, may need thermal breaks to improve insulation.
- Composite: Combines materials (e.g., wood and aluminium) for enhanced performance.
- Argon-Filled Units: Inert gas between panes reduces heat transfer.
- Krypton-Filled Units: Even better insulation than argon but more expensive.
- Low-E Glass: Coatings that reflect infrared light, keeping heat inside in winter and outside in summer.
- Tinted Glass: Reduces solar heat gain and glare.
- Laminated Glass: Improves security and reduces noise.
- Climate: In colder climates, prioritize low U-values; in warmer climates, focus on low solar heat gain.
- Orientation: South-facing windows benefit from solar gain; consider shading or glazing options.
- Local Weather Conditions: High-wind areas may require stronger frames and glazing.
- Warm Edge Spacers: Reduce heat loss around the edges of the glazing unit.
- Multiple Locking Points: Improve airtightness and security.
- Weatherstripping: Seals gaps to prevent drafts.
- Tilt-and-Turn Mechanisms: Allow for better ventilation control.
- Integrated Blinds: Built-in blinds between panes reduce glare and heat gain.
- Get Multiple Quotes: Compare prices from different suppliers and installers.
- Consider Long-Term Savings: Higher initial costs may be offset by energy bill reductions.
- Look for Incentives: Check for government grants or rebates for energy-efficient upgrades.
- Prioritize High-Impact Areas: If budget is limited, replace windows in rooms with the most energy loss.
- Check Certifications: Look for installers accredited by FENSA or CERTASS.
- Review References: Ask for customer testimonials or view previous work.
- Verify Insurance: Ensure they have liability insurance and offer warranties.
- Get Detailed Quotes: Understand what’s included in the price, such as disposal of old windows.
- Regular Cleaning: Keep glass and frames clean to maintain appearance and function.
- Inspect Seals: Check for cracks or gaps in seals and weatherstripping.
- Lubricate Hardware: Ensure locks and hinges operate smoothly.
- Check Drainage Holes: Clear any blockages to prevent water accumulation.
- Repaint or Refinish Frames: For wooden frames, protect against weathering.
- Focusing Only on Price: Ignoring quality and performance can lead to higher long-term costs.
- Neglecting Installation Quality: Poor installation can negate energy efficiency benefits.
- Overlooking Frame Material: Not considering the impact of frame materials on efficiency and maintenance.
- Ignoring Local Climate: Choosing windows unsuitable for your climate reduces effectiveness.
- Not Checking Certifications: Missing out on verified energy performance ratings.
- Window Installation and Replacement: Professional services to help you choose energy-efficient windows and ensure proper installation.
- General Maintenance: Routine upkeep to keep your property in optimal condition.
- Refurbishment: Comprehensive property upgrades tailored to your needs.
- Insulation Services: Improve your home’s energy efficiency with quality insulation.
- Handyman Services: Versatile assistance for various tasks around your property.
- Reliability: We deliver hassle-free, dependable service that you can trust.
- Expertise: Our skilled team ensures high-quality workmanship on every project.
- Accreditations: We are accredited by Alcumus SafeContractor and Alcumus SafePQQ, demonstrating our commitment to safety and professionalism.
- Customer Satisfaction: See our reviews on Trustpilot and discover why clients choose us for their property enhancement needs.
How to Keep Your Home’s Siding in Top Shape
Your home’s siding is not only a significant aesthetic feature but also a crucial protective layer against the elements. Proper maintenance ensures it remains attractive and functional for years to come. In this comprehensive guide, we’ll show you how to maintain home siding, covering various siding materials and providing tips to keep them in excellent condition.
Table of Contents
1. Why Siding Maintenance Is Important
Maintaining your home’s siding is essential to preserve its appearance and structural integrity. Over time, siding can accumulate dirt, develop mould, or suffer damage from weather and pests. By taking steps to maintain home siding, you prevent minor issues from escalating into costly repairs or replacements.
Benefits of Siding Maintenance:
SEO Keywords: maintain home siding, importance of siding maintenance, siding care benefits
2. Types of Home Siding
Understanding your siding material is crucial for proper maintenance. Different materials require specific care techniques. Common siding types include:
Siding Materials:
Tip: Refer to the manufacturer’s guidelines for specific maintenance instructions.
3. Safety Precautions Before You Begin
When you maintain home siding, safety should be a priority. Working at heights or using chemicals requires caution.
Safety Tips:
SEO Keywords: maintain home siding safely, siding maintenance safety, safety tips for siding care
4. Tools and Materials Needed
Having the right tools and materials makes siding maintenance more efficient and effective.
Tools:
Materials:
Tip: Choose cleaning products appropriate for your siding material to prevent damage.
5. How to Maintain Home Siding
Regular maintenance involves cleaning, inspecting, and addressing minor issues promptly. Here’s how to maintain home siding effectively:
Step 1: Regular Cleaning
Step 2: Inspect for Damage
Step 3: Address Issues Promptly
SEO Keywords: how to maintain home siding, siding maintenance steps, siding care guide
6. Cleaning Tips for Different Siding Materials
Different siding materials require specific cleaning methods to avoid damage.
Vinyl Siding
Wood Siding
Fiber Cement Siding
Brick and Stone Veneer
Tip: Always test cleaning solutions on a small, inconspicuous area first.
7. Repairing Common Siding Issues
Addressing minor repairs promptly helps maintain the integrity of your siding.
Cracks and Holes
Loose or Missing Panels
Caulking and Sealing
SEO Keywords: repair siding issues, maintain home siding, siding repair tips
8. Preventative Maintenance Strategies
Implementing preventative measures helps you maintain home siding and avoid extensive repairs.
Regular Inspections
Control Moisture
Pest Prevention
Tip: Keeping up with small tasks prevents larger issues down the line.
9. When to Call a Professional
Some siding issues may require expert attention to ensure proper repair and safety.
Consider Hiring a Professional If:
SEO Keywords: professional siding repair, when to hire experts, maintain home siding
10. Common Mistakes to Avoid
Avoiding these mistakes will help you successfully maintain home siding and prolong its lifespan.
Mistakes:
Tip: Always follow best practices and manufacturer recommendations for siding care.
11. Conclusion
Keeping your home’s siding in top shape doesn’t have to be a daunting task. By following the steps outlined in this guide, you can effectively maintain home siding, ensuring it remains both beautiful and functional for years to come. Regular cleaning, prompt repairs, and preventative measures will protect your investment and enhance your home’s curb appeal. Remember, when in doubt or facing significant issues, don’t hesitate to consult a professional to ensure the best results.
12. About Wrestore
Commercial and Residential Property Maintenance Specialists
At Wrestore, we are dedicated to helping homeowners maintain and enhance their properties. Based in London and serving areas within the M25, we bring over 30 years of combined experience in the property and built environment sector.
Our Services Include:
For more information on our services, visit our services page.
Why Choose Wrestore?
Check out our blog for more home maintenance tips, including our article on Repair Broken Roof Shingles Easily with This Guide.
Contact Us Today
Phone: +44 (0)207 183 2771
Email: works@wrestore.co.uk
Address: 227 Waterloo Road, London, SE1 8XH
Visit our website to learn more about how we can assist you in maintaining your home’s siding and other property maintenance needs.
Protect and beautify your home by giving your siding the care it deserves. Follow this guide to effectively maintain home siding and enjoy lasting results.
Meta Description: Learn how to maintain home siding with our comprehensive guide. Discover tips and techniques to keep your home’s siding looking its best for years.
SEO Keywords Summary: maintain home siding, siding maintenance tips, home siding care, siding repair, Wrestore, London property maintenance
Note: This blog post is intended for informational purposes and should not replace professional advice. Always consult qualified professionals for specific concerns related to your property.
Looking for more exterior home maintenance advice? Read our article on Repair Driveway Cracks Fast with These Methods.
For additional information on siding maintenance, visit the HGTV’s Siding Maintenance Tips. You can also consult the Health and Safety Executive’s guidelines on working safely at heights.


Avoid These Common Mistakes in DIY Projects
Embarking on a DIY project can be both exciting and rewarding. However, without proper planning and knowledge, it’s easy to run into problems that can derail your efforts. In this comprehensive guide, we’ll help you avoid DIY mistakes by highlighting common pitfalls and providing tips on how to prevent them. Whether you’re a seasoned DIY enthusiast or a beginner, this guide will equip you with the information you need for a successful project.
Table of Contents
1. Why DIY Projects Go Wrong
DIY projects fail for various reasons, often due to a combination of inexperience, lack of preparation, and overconfidence. Understanding why projects go awry can help you avoid DIY mistakes and achieve better outcomes.
Common Causes of DIY Failures:
SEO Keywords: avoid DIY mistakes, DIY project failures, common DIY pitfalls
2. Common Mistake 1: Lack of Planning
One of the most significant mistakes is diving into a project without a solid plan. Proper planning is crucial to avoid DIY mistakes that can cost you time and money.
How to Avoid:
Tip: Consider drawing diagrams or sketches to visualize the project better.
3. Common Mistake 2: Using the Wrong Tools
Using inappropriate tools can lead to subpar results and even cause injury. Therefore, it’s essential to use the right tools for each task to avoid DIY mistakes.
How to Avoid:
SEO Keywords: avoid DIY mistakes, wrong tools in DIY, proper tool usage
4. Common Mistake 3: Ignoring Safety Precautions
Safety should always be a priority. Ignoring safety measures can result in accidents, injuries, and project setbacks.
How to Avoid:
Tip: Never rush through a task; taking your time can prevent accidents.
5. Common Mistake 4: Skipping Preparation Steps
Preparation is key to a successful DIY project. Skipping steps like surface preparation or measurements can lead to poor results.
How to Avoid:
SEO Keywords: avoid DIY mistakes, importance of preparation, DIY project prep
6. Common Mistake 5: Underestimating Time and Cost
Many DIYers underestimate how long a project will take and how much it will cost, leading to frustration and incomplete projects.
How to Avoid:
Tip: It’s better to overestimate than underestimate time and costs.
7. Common Mistake 6: Taking on Projects Beyond Skill Level
Taking on a project that’s too complex can lead to mistakes, safety hazards, and unsatisfactory results. It’s important to know your limits to avoid DIY mistakes.
How to Avoid:
SEO Keywords: avoid DIY mistakes, DIY skill level, choosing appropriate DIY projects
8. Common Mistake 7: Neglecting Building Codes and Permits
Ignoring local building codes and permit requirements can lead to legal issues and unsafe structures.
How to Avoid:
Tip: Failure to comply can result in fines or the need to redo work.
9. Tips to Avoid DIY Mistakes
By implementing these strategies, you can minimize errors and enhance the success of your DIY projects.
Helpful Tips:
SEO Keywords: avoid DIY mistakes, DIY success tips, preventing DIY errors
10. When to Call a Professional
Sometimes, it’s best to leave certain projects to the experts, especially when they involve significant risk or complexity.
Consider Hiring a Professional If:
Tip: Weigh the pros and cons of DIY versus professional services before deciding.
11. Conclusion
DIY projects can be fulfilling and cost-effective when done correctly. By being aware of common pitfalls and taking steps to avoid DIY mistakes, you can enhance your skills and achieve impressive results. Remember to plan thoroughly, prioritize safety, and know your limits. When in doubt, don’t hesitate to consult a professional to ensure the success and safety of your project.
12. About Wrestore
Commercial and Residential Property Maintenance Specialists
At Wrestore, we are dedicated to helping homeowners maintain and enhance their properties. Based in London and serving areas within the M25, we bring over 30 years of combined experience in the property and built environment sector.
Our Services Include:
For more information on our services, visit our services page.
Why Choose Wrestore?
Check out our blog for more home improvement tips, including our article on Choose the Right Paint for Every Room in Your Home.
Contact Us Today
Phone: +44 (0)207 183 2771
Email: works@wrestore.co.uk
Address: 227 Waterloo Road, London, SE1 8XH
Visit our website to learn more about how we can assist you with your home improvement projects and property maintenance needs.
Set yourself up for success by being informed and prepared. Follow this guide to avoid DIY mistakes and make your projects a triumph.
Meta Description: Learn how to avoid DIY mistakes with our comprehensive guide. Discover the common pitfalls in DIY projects and how to prevent them for successful results.
SEO Keywords Summary: avoid DIY mistakes, common DIY errors, DIY project tips, prevent DIY failures, Wrestore, London property maintenance
Note: This blog post is intended for informational purposes and should not replace professional advice. Always consult qualified professionals for specific concerns related to your property.
Looking for more home improvement advice? Read our article on Refinish Wood Floors with These DIY Tips.
For additional guidance on DIY projects, visit the B&Q Ideas & Advice page. You can also consult the Health and Safety Executive’s Toolbox Talks for safety information.


Handle Rat and Pest Infestations Safely
Rats and other pests can pose significant health risks and cause substantial property damage if not addressed promptly. Handling a rat infestation requires careful planning and execution to ensure safety and effectiveness. In this comprehensive guide, we’ll explore how to handle rat pest control safely, providing you with the knowledge to protect your home and family.
Table of Contents
1. Why Rat Pest Control Is Important
Rats are not just a nuisance; they are carriers of diseases and can cause significant structural damage to your property. Addressing a rat infestation promptly is crucial to maintain a safe and healthy living environment.
Consequences of Ignoring Rat Infestations:
SEO Keywords: handle rat pest control, importance of rat control, rat infestation risks
2. Signs of a Rat Infestation
Identifying the early signs of a rat infestation is essential to address the problem before it escalates. Here are common indicators:
Warning Signs:
Tip: Regular inspections can help detect infestations early, making control efforts more effective.
3. Health Risks Associated with Rats
Rats can transmit various diseases to humans directly through bites or indirectly through contaminated food and surfaces.
Common Diseases:
SEO Keywords: handle rat pest control, rat-related diseases, health risks of rats
4. Safety Precautions Before You Begin
Handling rat pest control requires caution to protect yourself from diseases and injuries.
Safety Tips:
Tip: Always wash your hands thoroughly after handling traps or cleaning affected areas.
5. Methods to Handle Rat Pest Control
There are several effective methods to handle rat pest control. Combining multiple strategies often yields the best results.
Method 1: Trapping
Method 2: Rodenticides (Use with Caution)
Method 3: Exclusion Techniques
Method 4: Environmental Management
SEO Keywords: handle rat pest control, rat control methods, DIY rat pest control
6. Preventing Future Infestations
After addressing the immediate problem, take steps to prevent rats from returning.
Preventative Measures:
Tip: Educate family members about the importance of these measures to ensure everyone contributes to prevention efforts.
7. When to Call a Professional
Severe infestations or situations where DIY methods are ineffective may require professional pest control services.
Consider Hiring a Professional If:
SEO Keywords: professional rat pest control, when to hire pest control, handle rat pest control
8. Common Mistakes to Avoid
Avoiding these mistakes will help ensure effective and safe rat pest control.
Mistakes:
Tip: Consistency and thoroughness are key to successful rat pest control.
9. Conclusion
Dealing with a rat infestation requires prompt and decisive action. By following the methods outlined in this guide, you can handle rat pest control safely and effectively, protecting your home and family from the risks associated with rats. Remember to prioritize safety, use the appropriate control methods, and take preventative measures to keep rats from returning. If the problem persists, don’t hesitate to seek professional assistance.
10. About Wrestore
Commercial and Residential Property Maintenance Specialists
At Wrestore, we are dedicated to helping homeowners maintain and enhance their properties. Based in London and serving areas within the M25, we bring over 30 years of combined experience in the property and built environment sector.
Our Services Include:
For more information on our services, visit our services page.
Why Choose Wrestore?
Check out our blog for more home maintenance tips, including our article on Repair Broken Roof Shingles Easily with This Guide.
Contact Us Today
Phone: +44 (0)207 183 2771
Email: works@wrestore.co.uk
Address: 227 Waterloo Road, London, SE1 8XH
Visit our website to learn more about how we can assist you with handling rat pest control and other property maintenance needs.
Protect your home and health by addressing rat infestations promptly. Follow this guide to safely handle rat pest control and prevent future problems.
Note: This blog post is intended for informational purposes and should not replace professional advice. Always consult qualified pest control professionals for specific concerns related to your property.
Looking for more home maintenance advice? Read our article on Maintain Your Water Heater for Long-Term Savings.
For additional information on rat pest control, visit the British Pest Control Association’s guide on rat control. You can also consult the UK Government’s guidelines on pest control responsibilities.


Repair Broken Roof Shingles Easily with This Guide
A damaged roof can lead to serious problems, including leaks, mould growth, and structural damage. Fortunately, many minor roofing issues can be addressed without professional help. In this comprehensive guide, we’ll show you how to repair roof shingles easily and effectively, helping you protect your home and extend the life of your roof.
Table of Contents
1. Why Repairing Roof Shingles Is Important
Damaged or missing roof shingles can expose your home to the elements, leading to leaks and water damage. By promptly addressing shingle issues, you prevent minor problems from becoming major repairs. Additionally, maintaining your roof enhances your home’s curb appeal and can improve energy efficiency.
Benefits of Repairing Roof Shingles:
SEO Keywords: repair roof shingles, importance of shingle repair, benefits of fixing roof shingles
2. Common Causes of Shingle Damage
Understanding what leads to shingle damage can help you prevent future issues. Here are some common causes:
Causes:
Tip: Regular roof inspections can help identify damage early.
3. Safety Precautions Before You Start
Working on a roof can be dangerous. Therefore, it’s essential to take safety precautions to protect yourself.
Safety Tips:
SEO Keywords: repair roof shingles safely, roof repair safety precautions, safety tips for shingle repair
4. Tools and Materials Needed
Gathering the right tools and materials before you start will make the repair process smoother.
Tools:
Materials:
Tip: Match the replacement shingles to your existing roof for a seamless repair.
5. How to Inspect Your Roof for Damage
Before you repair roof shingles, you need to identify the damaged areas.
Inspection Steps:
SEO Keywords: inspect roof for damage, roof shingle inspection, repair roof shingles
6. Steps to Repair Roof Shingles
Once you’ve identified the damaged shingles, follow these steps to repair them:
Step 1: Remove the Damaged Shingle
Step 2: Prepare the Replacement Shingle
Step 3: Install the New Shingle
Step 4: Seal the Repair
Tip: For minor cracks or small areas of damage, you may be able to apply roofing sealant without replacing the entire shingle.
7. When to Call a Professional
While many minor shingle repairs can be done DIY, some situations require professional expertise.
Consider Hiring a Professional If:
SEO Keywords: professional roof repair, when to hire a roofer, repair roof shingles
8. Preventative Maintenance Tips
Regular maintenance can extend the life of your roof and prevent future damage.
Maintenance Tips:
Tip: Address minor issues promptly to avoid costly repairs later.
9. Common Mistakes to Avoid
Avoiding these mistakes will help ensure a successful repair when you repair roof shingles:
Mistakes:
SEO Keywords: roof repair mistakes, avoid errors, repair roof shingles
10. Conclusion
Repairing broken roof shingles doesn’t have to be a daunting task. By following this guide, you can repair roof shingles easily and effectively, safeguarding your home against leaks and weather damage. Remember to prioritize safety, use the right materials, and consider professional help when necessary. Regular maintenance and prompt repairs will keep your roof in top condition for years to come.
11. About Wrestore
Commercial and Residential Property Maintenance Specialists
At Wrestore, we are dedicated to helping homeowners maintain and enhance their properties. Based in London and serving areas within the M25, we bring over 30 years of combined experience in the property and built environment sector.
Our Services Include:
For more information on our services, visit our services page.
Why Choose Wrestore?
Check out our blog for more home improvement tips, including our article on Repair Driveway Cracks Fast with These Methods.
Contact Us Today
Phone: +44 (0)207 183 2771
Email: works@wrestore.co.uk
Address: 227 Waterloo Road, London, SE1 8XH
Visit our website to learn more about how we can assist you with repairing roof shingles and other property maintenance needs.
Protect your home from leaks and damage. Follow this guide to easily repair roof shingles and keep your roof in top condition.
Note: This blog post is intended for informational purposes and should not replace professional advice. Always consult qualified professionals for specific concerns related to your property.
Looking for more DIY repair tips? Read our article on How to Patch Holes in Drywall: A Step-by-Step Guide.
For additional information on roof repair, visit the Family Handyman’s guide on shingle repair. You can also consult the Health and Safety Executive’s guidelines on roof work safety.


Pick Energy-Efficient Windows for Your Home
Windows play a crucial role in your home’s energy efficiency, comfort, and aesthetic appeal. Selecting the right windows can significantly reduce your energy bills, enhance indoor comfort, and even increase your property’s value. In this comprehensive guide, we’ll help you choose energy-efficient windows that meet your needs and preferences, ensuring you make an informed decision for your home.
Table of Contents
1. Why Choosing Energy-Efficient Windows Is Important
Windows are more than just a source of natural light and ventilation; they are a significant factor in your home’s energy consumption. Inefficient windows can lead to heat loss in the winter and heat gain in the summer, causing your heating and cooling systems to work harder. By opting to choose energy-efficient windows, you can reduce energy usage, lower utility bills, and create a more comfortable living environment.
Benefits of Energy-Efficient Windows:
SEO Keywords: choose energy-efficient windows, importance of energy-efficient windows, benefits of energy-saving windows
2. Understanding Window Energy Ratings
When you choose energy-efficient windows, it’s essential to understand the ratings that indicate their performance. In the UK, the British Fenestration Rating Council (BFRC) provides an energy rating system for windows, ranging from A++ (most efficient) to G (least efficient).
Key Ratings to Consider:
Tip: Look for windows with a BFRC rating of C or higher for optimal energy efficiency.
3. Types of Energy-Efficient Windows
Various window types offer different levels of energy efficiency. Understanding these types helps you choose energy-efficient windows that suit your home.
Common Types:
SEO Keywords: choose energy-efficient windows, types of energy-efficient windows, double glazing, triple glazing
4. Window Frame Materials and Their Impact
The material of your window frames affects not only aesthetics but also energy efficiency. Different materials have varying insulating properties.
Frame Materials:
Tip: Consider uPVC or composite frames for the best combination of efficiency and low maintenance.
5. Glazing Options for Energy Efficiency
Glazing plays a significant role in a window’s energy performance. Here are some glazing options to consider when you choose energy-efficient windows:
Glazing Options:
SEO Keywords: energy-efficient glazing options, choose energy-efficient windows, window glazing types
6. Considering Climate and Orientation
Your local climate and the orientation of your windows affect their energy performance. Tailoring your window choices accordingly can enhance efficiency.
Factors to Consider:
Tip: Use external shading devices or landscaping to control solar heat gain.
7. Energy-Saving Features to Look For
When you choose energy-efficient windows, look for features that enhance performance:
Key Features:
SEO Keywords: energy-saving window features, choose energy-efficient windows, window efficiency enhancements
8. Cost Considerations and Budgeting
Investing in energy-efficient windows can be cost-effective in the long run due to energy savings. However, upfront costs vary based on materials, glazing, and features.
Budgeting Tips:
Tip: Balance cost with performance to find the best value for your investment.
9. Working with Professional Installers
Proper installation is crucial to ensure your new windows perform as expected. Therefore, it’s important to work with experienced professionals when you choose energy-efficient windows.
How to Choose an Installer:
SEO Keywords: professional window installers, choose energy-efficient windows, window installation tips
10. Maintenance Tips for Energy-Efficient Windows
To keep your windows performing optimally, regular maintenance is essential.
Maintenance Tips:
Tip: Schedule annual inspections to address any issues promptly.
11. Common Mistakes to Avoid
Avoiding these mistakes will help you successfully choose energy-efficient windows and maximize their benefits.
Mistakes:
SEO Keywords: window selection mistakes, avoid errors, choose energy-efficient windows
12. Conclusion
Selecting the right windows for your home is a significant decision that impacts energy efficiency, comfort, and aesthetics. By understanding window ratings, materials, glazing options, and considering your local climate, you can confidently choose energy-efficient windows that meet your needs. Remember to work with reputable professionals for installation and maintain your windows properly to ensure they provide benefits for years to come. Making an informed choice today will lead to long-term savings and a more comfortable home environment.
13. About Wrestore
Commercial and Residential Property Maintenance Specialists
At Wrestore, we are dedicated to helping homeowners enhance their properties. Based in London and serving areas within the M25, we bring over 30 years of combined experience in the property and built environment sector.
Our Services Include:
For more information on our services, visit our services page.
Why Choose Wrestore?
Check out our blog for more home improvement tips, including our article on Maintain Your Water Heater for Long-Term Savings.
Contact Us Today
Phone: +44 (0)207 183 2771
Email: works@wrestore.co.uk
Address: 227 Waterloo Road, London, SE1 8XH
Visit our website to learn more about how we can assist you in choosing energy-efficient windows and enhancing your property.
Make a smart investment in your home’s comfort and energy savings. Follow this guide to confidently choose energy-efficient windows for your home.
Meta Description: Choose energy-efficient windows for your home with our comprehensive guide. Learn how to select the best windows to save energy and reduce costs.
SEO Keywords Summary: choose energy-efficient windows, energy-saving windows, window selection guide, home energy efficiency, Wrestore, London property maintenance, window installation
Note: This blog post is intended for informational purposes and should not replace professional advice. Always consult qualified professionals for specific concerns related to your property.
Looking for more energy-saving tips? Read our article on HVAC System Maintenance: How to Sort Your HVAC System for Better Performance and Lower Energy Bills.
For additional information on energy-efficient windows, visit the Energy Saving Trust’s guide on windows. You can also consult the UK Government’s Building Regulations Approved Document L for energy efficiency requirements.

